Monday, May 14, 2018

Biometric authentication - Face/Touch ID


Face/Touch Id Authentication integration into the app.

The code demonstrates how to integrate Face Id authentication integration into the app. Face Id is currently supported on iPhone X. This Code also works for touchId authentication.

Class BiometricAuthentication in this project is responsible for biometeric authentication and notify the success / fail status by posting Notifications

How to use BiometricAuthentication class?
Create an instance of BiometricAuthentication class
Call authenticationWithBiometricID to initiate the authentication process
Add notification observerers as below:
NotificationCenter.default.addObserver(self, selector: #selector(LoginVC.authenticationCompletionHandler(loginStatusNotification:)), name: .BiometricAuthenticationNotificationLoginStatus, object: nil)

Typecast userInfo[BiometricAuthentication.status] to BiometricAuthenticationStatus instance (authStatus) that holds the response object. a) check if authStatus.success is true for successfull authentication b) if authStatus.success is false, check for authStatus.errorMessage for error message and authStatus.errorCode for LAError code. Currently all the possible error codes are mapped to error message in the response.

A sample project can be found at github.

Monday, October 30, 2017

In App Purchase: A Walkthrough

At first glance, adding in-app purchases seems like it would be a walk in the park. Apple provides plenty of documentation that should get developers up and running in no time.
So, why is adding in-app purchases such a royal pain in the arse?
Because, inevitably, something will go wrong. And when that moment arrives, you’re screwed. Apple provides a beastly amount of documentation on in-app purchases, but they don’t provide the right kind of documentation. Nowhere is there mention of the setup steps you have to take to get in-app purchases to work. Nowhere is there a checklist you can reference if your StoreKit integration doesn’t work. Nowhere is there an NSError object that tell you exactly why your product ID is invalid.
You are left to flounder and flail like a wet noodle as you exhaustively try every possible solution on the web.
Losing days of productivity on this is ridiculous. To save you the pain and suffering I went through, this post details every step you need to take to implement in-app purchases. It’s detailed. It’s long. It’s probably overly-detailed and overly-long. But, unlike the Apple docs, it contains every single step necessary for any developer to implement in-app purchases.
Without further ado, let’s get started.

Overview

Ok, folks, here’s the secret to getting in-app purchases working: break it into two distinct steps:
  1. Create and fetch a product description
  2. Purchase a product
The first step is where you will likely run into problems. Once you can successfully fetch a product description in code, writing the code to purchase the product is cake.
We’ll tackle the product description step first.

Create and Fetch a Product Description

Here is a (very) rough overview of each step required to create a new product and fetch its description:
  1. Create a unique App ID
  2. Generate and install a new provisioning profile
  3. Update the bundle ID and code signing profile in Xcode
  4. If you haven’t already, submit your application metadata in iTunes Connect
  5. Add a new product for in-app purchase
  6. Write code for fetching the product description
  7. Wait a few hours
The code for fetching a product description is really simple. The setup steps, on the other hand, are rife with peril.
NOTE: You do NOT need to create an in-app test user in iTunes Connect to fetch a product description.

1. Create a Unique App ID

To support in-app purchases, your App ID cannot include a wildcard character (“*”). To see if your App ID contains a wildcard, log in to http://developer.apple.com/iphone, and navigate to the iPhone Developer Program Portal. Select “App IDs” from the menu on the left, and look for your App ID.
This is a unique App ID:
    7DW89RZKLY.com.sampleapp.sampleappfree
This is not a unique App ID:
    7DW89RZKLY.com.sampleapp.*
If you don’t have a unique App ID, create one as follows:
  1. On the App IDs tab in the developer portal, select “New App ID”
  2. Fill in the following information:
    • Display name: Pick a different App ID name than you were using before. You can’t edit or delete old App IDs, so just give your App ID a new name to avoid confusion.
    • Prefix: Generate a new one, or choose an existing one if your app is one of a suite of apps that can share data via the Keychain Services API
    • Suffix: com.companyname.appname (this is the usual format – note lack of wildcard)
  3. Click “Save”
  4. Click the “Configure” link next to your App ID
  5. Check box next to “Enable In App Purchase”
  6. Click “Done”

2. Create a New Provisioning Profile

Now that you have a new App ID, you need to generate a new provisioning profile that points to the App ID.
Here’s the painfully detailed step-by-step for generating and installing a new provisioning profile:
  1. In the iPhone Developer Portal, select the Provisioning tab on the left
  2. Make sure you’re on the Development tab, and click “New Profile” in the top-right corner
  3. Fill in the requested information, and point to the unique App ID you just created
  4. If see “Pending” in the Actions column, just click the Development tab title to refresh
  5. Click “Download” to pull down the new profile
  6. Drag the profile onto the Xcode icon in the Dock to install
  7. Alternatively, if you want to preserve the name of the provisioning profile on disk, you can install the profile manually as follows:
    1. In Xcode, select Window > Organizer
    2. Select “Provisioning Profiles” category on the left
    3. Ctrl-click an existing profile > Reveal in Finder
    4. Drag and drop the new profile into the profile Finder window

3. Update Xcode Settings

After the profile is installed in Xcode, you need to make a couple edits to the project to use the provisioning profile:
  1. Edit your project’s .plist file so the Bundle ID entry matches the App ID. Ignore the alphanumeric sequence at the beginning of the ID. For instance, if your App ID is “7DW89RZKLY.com.sampleapp.sampleappfree” in the Developer Portal, just enter “com.sampleapp.sampleappfree” for the Bundle ID.
  2. Edit your project’s target info to use the new provisioning profile:
    1. Select Project > Edit Active Target
    2. Select the “Build” tab at the top
    3. Select the configuration you want (usually Debug)
    4. Select your new provisioning profile for the row labeled Code Signing Identity
    5. Select your new provisioning profile for the row directly underneath the Code Signing Identity row (probably labeled Any iPhone OS Device)

4. Add your Application

If your application is already available on the App Store, you can skip this step.
Before you can add a product in iTunes Connect, you must add the application the product is for. Don’t worry if you aren’t a 100% done with your app. You can still submit your app wtih stub data and add the real details later.
NOTE: Only the SKU and version fields are permanent and cannot be changed later.
  1. Navigate to http://developer.apple.com/iphone, and log in
  2. Follow the right-hand link to iTunes Connect
    • NOTE: you MUST be logged in to developer.apple.com first, or bad things will happen
  3. On the iTunes Connect homepage, click the “Manage Your Applications” link
  4. In the top-right corner, click “Create New Application”
  5. Fill out all the requested information for your app. When asked for your application binary, check the box indicating you will upload it later.

5. Add the Product

After all that setup, we are finally ready to add the product itself to iTunes Connect.
  1. Make sure you are logged in to http://developer.apple.com/iphone
  2. Navigate to the iTunes Connect homepage
  3. Click the “Manage Your in App Purchases” link
  4. Click “Create New”
  5. Select your application
  6. Fill in the production information:
    • Reference Name: common name for the product. I used “Pro Upgrade”. This name is non-editable, and it will not be displayed in the App Store.
    • Product ID: unique id for your app. Typically of the form com.company.appname.product, but it can be whatever you want. It does not need to have your app’s App ID as a prefix.
    • Type: You have 3 choices:
      • Non-consumable: only pay once (use this if you want a free-to-pro-upgrade product)
      • Consumable: pay for every download
      • Subscription: recurring payment
    • Price Tier: price of the product. See the price matrix for the different tiers.
    • Cleared for Sale: check this now. If you don’t, you will get back an invalid product ID during testing.
    • Language to Add: Pick one. The following two fields will appear:
      • Displayed Name: Name of your product shown to your user. I chose “Upgrade to Pro”.
      • Description: What the product does. The text you enter here is sent along with the Displayed Name and Price when you fetch an SKProduct in code.
    • Screenshot: Your feature in action. Despite the text on the screen about the screenshot submission triggering the product review process (a very sloppy design choice, IMHO), you can safely add the screenshot now without the product being submitted for review. After saving the product, just choose the “Submit with app binary” option. This will tie the product to the app binary, so when you finally submit the 100% complete app binary, the product will be submitted as well.
  7. Click “Save”

6. Write Code

Now, we finally write the code the fetches the product information we just added in iTunes Connect. To access the product data, we need to use the StoreKit framework.
NOTE: StoreKit does not work on the Simulator. You must test on a physical device.
  1. Add the StoreKit framework to your project.
  2. Add a reference to a SKProduct to your .h file:

// InAppPurchaseManager.h

#import <StoreKit/StoreKit.h>

#define kInAppPurchaseManagerProductsFetchedNotification @"kInAppPurchaseManagerProductsFetchedNotification"

@interface InAppPurchaseManager : NSObject 
{
   SKProduct *proUpgradeProduct;
   SKProductsRequest *productsRequest;
}  

NOTE: InAppPurchaseManager is a singleton class that handles every in app purchase for our app. It’s used throughout this post as an example implementation.
  1. Request the product, and implement the delegate protocol in the corresponding .m file:

// InAppPurchaseManager.m

- (void)requestProUpgradeProductData
{
   NSSet *productIdentifiers = [NSSet setWithObject:@"com.sampleapp.sampleappfree.upgradetopro" ];
   productsRequest = [[SKProductsRequest alloc] initWithProductIdentifiers:productIdentifiers];
   productsRequest.delegate = self;
   [productsRequest start];
   // we will release the request object in the delegate callback
} 


#pragma mark -
#pragma mark SKProductsRequestDelegate methods 

- (void)productsRequest:(SKProductsRequest *)request didReceiveResponse:(SKProductsResponse *)response
{
   NSArray *products = response.products;
   proUpgradeProduct = [products count] == 1 ? [[products firstObject] retain] : nil;
   if (proUpgradeProduct)
   {
      NSLog(@"Product title: %@" , proUpgradeProduct.localizedTitle);
      NSLog(@"Product description: %@" , proUpgradeProduct.localizedDescription);
      NSLog(@"Product price: %@" , proUpgradeProduct.price);
      NSLog(@"Product id: %@" , proUpgradeProduct.productIdentifier);
   }

   for (NSString *invalidProductId in response.invalidProductIdentifiers)
   {
      NSLog(@"Invalid product id: %@" , invalidProductId);
   }

   // finally release the reqest we alloc/init’ed in requestProUpgradeProductData
   [productsRequest release];

   [[NSNotificationCenter defaultCenter] postNotificationName:kInAppPurchaseManagerProductsFetchedNotification object:self userInfo:nil];

} 

A couple notes about the code above:
  • When specifying the product identifier, you must use the full product id. For instance, “com.sampleapp.sampleappfree.upgradetopro” is used above. “upgradetopro” alone will not work.
  • If response.products is nil in productsRequest:didReceiveResponse: and your product id shows up in the response.invalidProductIdentifers array, then prepare yourself mentally for a wild goose chase. The StoreKit API offers no help, no indication as to why your identifier was invalid, just that it is. Lovely, isn’t it?
  • The SKProduct class conveniently offers localized versions of your app title and description, but not price. To handle this omission, here’s a category that will provide a localized price string for the product as well:

// SKProduct+LocalizedPrice.h
#import <Foundation/Foundation.h>
#import <StoreKit/StoreKit.h>

@interface SKProduct (LocalizedPrice) 
   @property (nonatomic, readonly) NSString *localizedPrice;
@end 

// SKProduct+LocalizedPrice.m 

#import "SKProduct+LocalizedPrice.h" 

@implementation SKProduct (LocalizedPrice) 

- (NSString *)localizedPrice
{
   NSNumberFormatter *numberFormatter = [[NSNumberFormatter alloc] init];
   [numberFormatter setFormatterBehavior:NSNumberFormatterBehavior10_4];
   [numberFormatter setNumberStyle:NSNumberFormatterCurrencyStyle];
   [numberFormatter setLocale:self.priceLocale];
   NSString *formattedString = [numberFormatter stringFromNumber:self.price];
   [numberFormatter release];
   return formattedString;
} 

@end
After adding all the code above, give it a shot. You should see the product information gloriously regurgitated in your console window. However, you are more than likely getting back an invalid product ID. This post addresses exactly how to go about debugging this problem, but the very next section may in fact hold your solution.

7. Wait a Few Hours

Have you followed all the steps above to the letter, and your product is still reported as invalid? Have you painstakingly double, triple, quadruple-checked to make sure you have followed every step? Have you despaired from finding frighteningly little in-app purchase information on the web?
Then, you may just need to wait.
It takes a while for the product you added to iTunes Connect to permeate Apple’s distributed in-app sandbox environment. For me, I gave up in despair after the umpteenth time my product came back as invalid. 24 hours later, I hadn’t changed a line a code, but my IDs were coming back valid. I think it really only took a few hours for the product to propagate through Apple’s distributed network, but if you can afford to wait, you may want to give it 24 hours like I did.

Purchase a Product

At this point, you should be able to successfully fetch an SKProduct description for your product. Adding support for purchasing the product is relatively simple compared to getting the description. There are only three steps required:
  1. Write code for supporting transactions
  2. Add an in app test user in iTunes Connect
  3. Sign out of your iTunes Store account on your phone
  4. Test the purchase
We’ll start off by taking a look at the code required to support transactions.

1. Write Code for Supporting Transactions

First, a word of warning: you are responsible for developing the user interface for purchasing your product. StoreKit offers absolutely zero interface elements. If you want your purchase view to look like the App Store’s, well, you have to build it yourself.
All the code below is for the backend of the transaction process. It is a single class with a simple API that an outside class (like a view controller) can call to make the purchase. I recommend a similar approach if you are figuring out how best to integrate in app purchases in your app.
First, you need to conform to the SKPaymentTransactionObserver protocol:


// InAppPurchaseManager.h
// add a couple notifications sent out when the transaction completes

#define kInAppPurchaseManagerTransactionFailedNotification @"kInAppPurchaseManagerTransactionFailedNotification"

#define kInAppPurchaseManagerTransactionSucceededNotification @"kInAppPurchaseManagerTransactionSucceededNotification" 

…

@interface InAppPurchaseManager : NSObject 
{
   …
} 

// public methods

- (void)loadStore;
- (BOOL)canMakePurchases;
- (void)purchaseProUpgrade;

@end 

Above, we have defined two more notifications that will be sent out with the result of the purchase transaction. For the sake of this example, we are using the InAppPurchaseManager class again, just as we did when when fetching the product description.


// InAppPurchaseManager.m  

#define kInAppPurchaseProUpgradeProductId @"com.sampleapp.sampleappfree.upgradetopro" 
…

#pragma -
#pragma Public methods 
//
// call this method once on startup
//
- (void)loadStore
{
   // restarts any purchases if they were interrupted last time the app was open
   [[SKPaymentQueue defaultQueue] addTransactionObserver:self];
   // get the product description (defined in early sections)
   [self requestProUpgradeProductData];
} 

//
// call this before making a purchase
//
- (BOOL)canMakePurchases
{
   return [SKPaymentQueue canMakePayments];
} 

//
// kick off the upgrade transaction
//
- (void)purchaseProUpgrade
{
   SKPayment *payment = [SKPayment paymentWithProductIdentifier:kInAppPurchaseProUpgradeProductId];
   [[SKPaymentQueue defaultQueue] addPayment:payment];
} 

#pragma -
#pragma Purchase helpers 

//
// saves a record of the transaction by storing the receipt to disk
//
- (void)recordTransaction:(SKPaymentTransaction *)transaction
{
   if ([transaction.payment.productIdentifier isEqualToString:kInAppPurchaseProUpgradeProductId])
   {
      // save the transaction receipt to disk
      [[NSUserDefaults standardUserDefaults] setValue:transaction.transactionReceipt forKey:@"proUpgradeTransactionReceipt" ];
      [[NSUserDefaults standardUserDefaults] synchronize];
   }
} 

//
// enable pro features
//

- (void)provideContent:(NSString *)productId
{
if ([productId isEqualToString:kInAppPurchaseProUpgradeProductId])
{
   // enable the pro features
   [[NSUserDefaults standardUserDefaults] setBool:YES forKey:@"isProUpgradePurchased" ];
   [[NSUserDefaults standardUserDefaults] synchronize];
   }
} 

//
// removes the transaction from the queue and posts a notification with the transaction result
//
- (void)finishTransaction:(SKPaymentTransaction *)transaction wasSuccessful:(BOOL)wasSuccessful
{
   // remove the transaction from the payment queue.
   [[SKPaymentQueue defaultQueue] finishTransaction:transaction];
   NSDictionary *userInfo = [NSDictionary dictionaryWithObjectsAndKeys:transaction, @"transaction" , nil];
   if (wasSuccessful)
   {
      // send out a notification that we’ve finished the transaction
      [[NSNotificationCenter defaultCenter] postNotificationName:kInAppPurchaseManagerTransactionSucceededNotification object:self userInfo:userInfo];
   }
else
   {
      // send out a notification for the failed transaction
      [[NSNotificationCenter defaultCenter] postNotificationName:kInAppPurchaseManagerTransactionFailedNotification object:self userInfo:userInfo];
   }
} 


//
// called when the transaction was successful
//

- (void)completeTransaction:(SKPaymentTransaction *)transaction
{
   [self recordTransaction:transaction];
   [self provideContent:transaction.payment.productIdentifier];
   [self finishTransaction:transaction wasSuccessful:YES];
} 

//
// called when a transaction has been restored and and successfully completed
//
- (void)restoreTransaction:(SKPaymentTransaction *)transaction
{
   [self recordTransaction:transaction.originalTransaction];
   [self provideContent:transaction.originalTransaction.payment.productIdentifier];
   [self finishTransaction:transaction wasSuccessful:YES];
}  

//
// called when a transaction has failed
//
- (void)failedTransaction:(SKPaymentTransaction *)transaction
{
   if (transaction.error.code != SKErrorPaymentCancelled)
   {
      // error!
      [self finishTransaction:transaction wasSuccessful:NO];
   }
else
   {
      // this is fine, the user just cancelled, so don’t notify
      [[SKPaymentQueue defaultQueue] finishTransaction:transaction];
   }
} 

#pragma mark -
#pragma mark SKPaymentTransactionObserver methods 

//
// called when the transaction status is updated
//

- (void)paymentQueue:(SKPaymentQueue *)queue updatedTransactions:(NSArray *)transactions
{
   for (SKPaymentTransaction *transaction in transactions)
   {
      switch (transaction.transactionState)
      {
         case SKPaymentTransactionStatePurchased:
            [self completeTransaction:transaction];
            break;

         case SKPaymentTransactionStateFailed:
            [self failedTransaction:transaction];
            break; 

         case SKPaymentTransactionStateRestored:
            [self restoreTransaction:transaction];
            break; 

         default:
            break;
      }
   }
} 

In order to test this jumble of new code, you will need to write the code that calls the loadStore, canMakePurchases, and purchaseProUpgrade methods as well.
As you can see, there’s a good bit of code required to support transactions. For a full explanation of the code, see the official In App Purchase Programming Guide – http://developer.apple.com/iphone/library/documentation/NetworkingInternet/Conceptual/StoreKitGuide/AddingaStoretoYourApplication/AddingaStoretoYourApplication.html#//apple_ref/doc/uid/TP40008267-CH101-SW1.
The code above has a few parts that are specific to my implementation. Most notably, in provideContent:, the @"isProUpgradePurchased" BOOL field of NSUserDefaults is set to YES. All throughout the rest of the application, this BOOL is checked to determine whether or not to enable the pro features. If you are also implementing a free to pro upgrade product, I recommend using the same approach.

2. Add a Test User

In order to try out the mess of code you just added to your project, you will need to create a user in iTunes Connect for testing in app purchases. You can use this test account to purchase a product without being charged by Apple.
To create a test user, follow these steps:
  1. Log in to http://developer.apple.com/iphone
  2. Navigate to iTunes Connect
  3. Select “Manage Users” on the iTunes Connect home page
  4. Select “In App Purchase Test User”
  5. Select “Add New User”
  6. Fill out the user information. None of the information needs to be legit. I recommend a short, fake email address and a short password since you will need to type it in your phone during testing.
  7. Select “Save”
You will enter the email and password for this user on the iPhone during your testing.

3. Sign Out On Your Device

Before you can start testing in app purchases, you must sign out of the iTunes Store on your device. To sign out, follow these steps:
  1. Open the Settings App
  2. Tap the “Store” row
  3. Tap “Sign Out”

4. Test the Purchase

Now, you are finally ready to try out an in app purchase. Testing is simple:
  1. Run your app on your device
  2. Trigger the purchase
  3. When prompted for username and password, enter your test user details
If you repeat the purchase with the same account, you will be notified that you have already made the purchase. This is fine, just click “Yes” when prompted if you want to download the product again.

That’s a Wrap

Getting in app purchases to work is a lot more painful than it should be. It took several days of blood, sweat, and tears to get it working in my own application, and hopefully this post has helped short circuit that cycle of pain and suffering for you as well.

Monday, July 24, 2017

Compress File(s) with using Minizip and ZipArchive – iPhone / iPad

Here's a simple class for compressing and extracting files. Its work depends on minizip, which is a open source zip format library.

The major class name is ZipArchive, it’s easy to use, you can declare a instance and call initialize functions, and then call addFileToZip or UnzipFileTo to finish compression or uncompression. Lets see how to use it.

------------------------------
First download ZipArchive and Minizip from here.

Add all the files to you project, and and framework libz.1.2.3.dylib

Include ZipArchive.h using #import "ZipArchive/ZipArchive.h" or #import "ZipArchive.h"

------------------------------

NSArray *paths = NSSearchPathForDirectoriesInDomains(NSDocumentDirectory, NSUserDomainMask, YES);

//get app’s documents directory

NSString *documentsDirectory = [paths objectAtIndex:0];

NSString *tmpPathToFile = [documentsDirectory stringByAppendingPathComponent:@"mypicture.jpg"];

//you can give any name to zip file and ZipArchive will save the zip file to your app’s document directory.

NSString *zipFileTo = [documentsDirectory stringByAppendingPathComponent:@"mycompressedfile.zip"];

ZipArchive *zip = [[ZipArchive alloc] init];

BOOL result = [zip CreateZipFile2:zipFileTo];

//add only one file

ret = [zip addFileToZip:tmpPathToFile newname:@"mypicture.png"];

//add multiple files to your zip file. sample “files” array is an NSMutableArray and it contains only file name like, “mypicture1″, “mypicture2″

for (int i = 0; i<[files count]; i++) {

//physical path of your file

NSString *otherFile = [documentsDirectory stringByAppendingPathComponent:[NSString stringWithFormat:@"%@.png",[files objectAtIndex:i]]];

//add the file with new name

ret = [zip addFileToZip:otherFiles newname:[NSString stringWithFormat:@"%@.png",[files objectAtIndex:i]]];

}

BOOL success = [zip CloseZipFile2];

[zip release];

Tuesday, June 30, 2015

Playing video using MediaPlayer Framework (Part II)

Customizing the Movie Display Size

In my previous post, we have embedded movie player in our application which played the movie in fullscreen mode. However, the great part about the MPMoviePlayerController enhancements in iOS 4 is that you can now specify a custom display size for playback within your own view controllers. To take advantage of this, modify the playMovie: method as follows:


[moviePlayerController.view setFrame:CGRectMake(30, 100, 250, 170)];

[self.view addSubview:moviePlayerController.view];
//moviePlayerController.fullscreen = YES;

[moviePlayerController play];


On first line we create a custom frame size for the movie playback with the CGRectMake function. The values I have entered were taken from Interface Builder and match the origin, height, and width of the custom UIButton we use to play the movie. Note that I also commented out the fullscreen command.
If you build and go with your project code now, you should see that clicking the button will now play the video within our custom view controller, right on top of the UIButton. This works well enough, but what if you want to move the button around a bit to find the right look? It’s a bit cumbersome to constantly copy the literal CGRect values all the time. Update the playMovie method to do this dynamically:


-(IBAction)playMovie:(id)sender
{
UIButton *playButton = (UIButton *) sender;

NSString *filepath = [[NSBundle mainBundle] pathForResource:@"sample-movie-clip" ofType:@"m4v"];
NSURL *fileURL = [NSURL fileURLWithPath:filepath];
MPMoviePlayerController *moviePlayerController = [[MPMoviePlayerController alloc] initWithContentURL:fileURL];

[[NSNotificationCenter defaultCenter] addObserver:self
selector:@selector(moviePlaybackComplete:)
name:MPMoviePlayerPlaybackDidFinishNotification
object:moviePlayerController];

[moviePlayerController.view setFrame:CGRectMake(playButton.frame.origin.x,
playButton.frame.origin.y,
playButton.frame.size.width,
playButton.frame.size.height)];

[self.view addSubview:moviePlayerController.view];
//moviePlayerController.fullscreen = YES;

[moviePlayerController play];
}


On third line, we typecast the “sender” parameter to a UIButton object as we know that is the kind of object that will be sending this message to our view controller. We then access this object directly to get the X and Y origin of the button as well as the button width and height. With the code above implemented, we are free to move the UIButton anywhere on the canvas and not have to worry about constantly updating our CGRectMake function call.

Rotating our Video

Our video player should support both landscape as well as portrait orientation. For this purpose just add this code in the controller:

// Override to allow orientations other than the default portrait orientation.
- (BOOL)shouldAutorotateToInterfaceOrientation:(UIInterfaceOrientation)interfaceOrientation {
// Return YES for supported orientations
return YES;
}


A word on Scaling Mode

When displaying video in a custom rectangle, you will sometimes need to modify the scalingMode property of the MPMoviePlayerController object. Setting this property will determine how the movie image adapts to fill the playback size you have defined. The available scaling mode settings are as follows:


* MPMovieScalingModeNone
* MPMovieScalingModeAspectFit
* MPMovieScalingModeAspectFill
* MPMovieScalingModeFill


Each of the above options functions as you might expect, with MPMovieScalingModeAspectFill and MPMovieScalingModeFill likely being the two most commonly used modifications. The default scaling mode is MPMovieScalingModeAspectFit.

To experiment with this property in our code, insert the following line just before the [moviePlayerController play] statement:

moviePlayerController.scalingMode = MPMovieScalingModeFill;


You will see that our video now fills all available space in the playback rectangle.

This provides you a fundamental ntroduction to using the MPMoviePlayerController class with the MediaPlayer framework. The MPMoviePlayerController class has additional options that we haven’t covered here, but I’ll leave the exploration of those as an exercise for the reader. With the foundation from this tutorial in place, you should be able to begin experimenting on your own!
Happy Coding!

Sunday, May 24, 2015

Playing video using MediaPlayer Framework (Part I)

This is a step-by-step overview of how to integrate the MediaPlayer framework and work with the MPMoviePlayerController class in iOS4.

Step 1: Add the MediaPlayer Framework
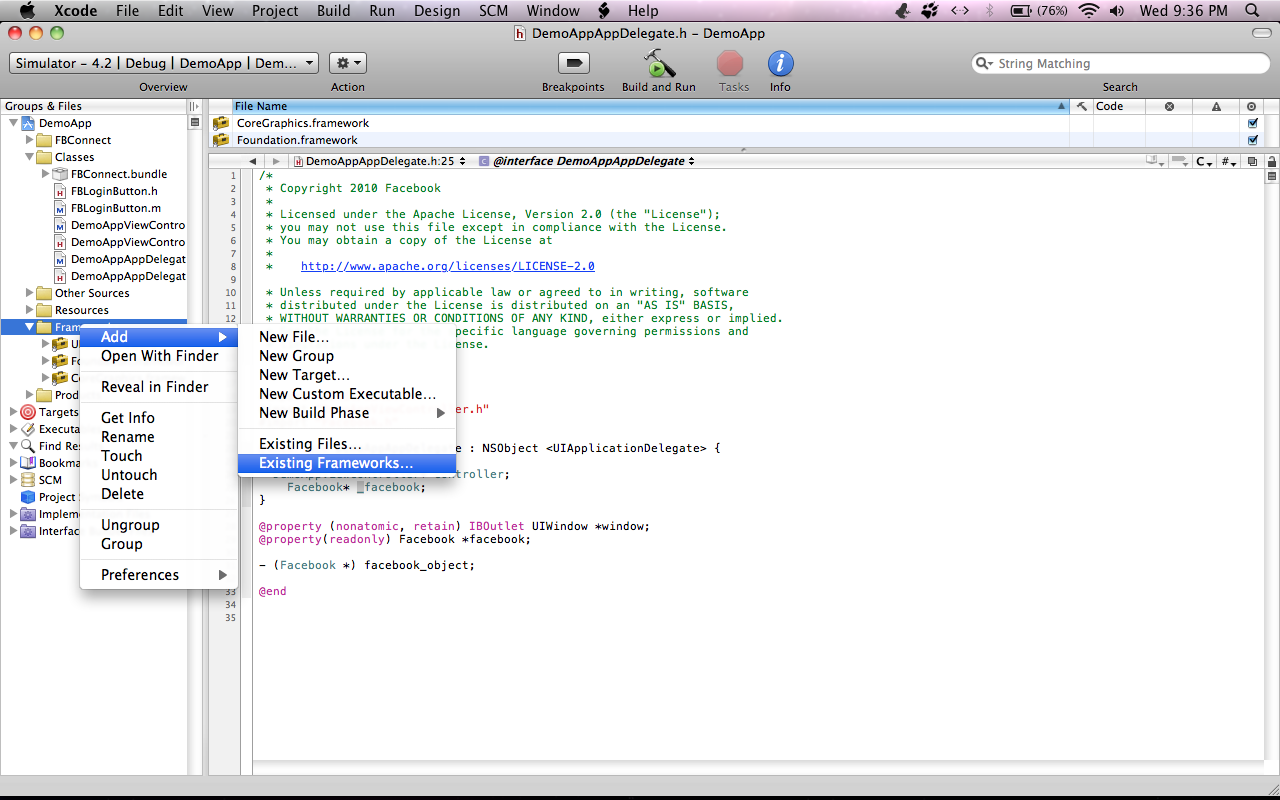
CTRL + Click (or right click) on the “Frameworks” folder in the “Groups & Files” pane in Xcode. Select Add > Existing Frameworks from the drop-down menu.


Select “MediaPlayer.framework” from the list of options presented, and click “Add.”


Step 2: Import the MediaPlayer Framework and Declare the playMovie Method

After adding the MediaPlayer framework into your project, you need to import it into the view controller responsible for playing the movie. Insert the following line at the top of .h file of your controller


#import
#import


Now we will declare an instance method will will be called to trigger movie playback.
Just above the @end statement in the header file, add this line
-(IBAction)playMovie:(id)sender;


Step 3: Implementing the playMovie method

Open the .m file of your view controller and add the following implementation of playMovie: method which we have declared earlier in our header file


- (IBAction)playMovie:(id)sender
{
NSString *filepath = [[NSBundle mainBundle] pathForResource:@"sample-movie-clip" ofType:@"m4v"];
NSURL *fileURL = [NSURL fileURLWithPath:filepath];
MPMoviePlayerController *moviePlayerController = [[MPMoviePlayerController alloc] initWithContentURL:fileURL];
[self.view addSubview:moviePlayerController.view];
moviePlayerController.fullscreen = YES;
[moviePlayerController play];
}


In the first line we create a NSString containing the file path to our movie file. Next line uses that file path to create NSURL to our local movie. Then we initialize the MPMoviePlayer with that file URL and adds it over the current view controller's view.

Now, open up viewController.xib file in Interface Builder and add a "Play" button. Connect it with our playMovie: method.

Step 4: Memory Management
In our playMovie: method, we explicitly allocated memory for the moviePlayerController object which is never being released. We cannot release this object in the method we allocated it in because our movie will still be playing at the time this method completes execution. It also isn’t safe to autorelease the object because we don’t know if our movie will still be playing the next time the autorelease pool is drained. Fortunately, the MPMoviePlayerController object is prebuilt to handle this scenario, and will dispatch a notification called MPMoviePlayerPlaybackDidFinishNotification to the NSNotificationCenter when playback completes. In order to receive this notification, we must register an “observer” to respond to that specific notification. To do so, modify our playMovie: method as follows:


NSString *filepath = [[NSBundle mainBundle] pathForResource:@"sample-movie-clip" ofType:@"m4v"];
NSURL *fileURL = [NSURL fileURLWithPath:filepath];
MPMoviePlayerController *moviePlayerController = [[MPMoviePlayerController alloc] initWithContentURL:fileURL];

[[NSNotificationCenter defaultCenter] addObserver:self
selector:@selector(moviePlaybackComplete:)
name:MPMoviePlayerPlaybackDidFinishNotification
object:moviePlayerController];

[self.view addSubview:moviePlayerController.view];
moviePlayerController.fullscreen = YES;
[moviePlayerController play];


We now need to create moviePlaybackComplete:, the selector we just registered. Add the following underneath the playMovie: method:


- (void)moviePlaybackComplete:(NSNotification *)notification
{
MPMoviePlayerController *moviePlayerController = [notification object];
[[NSNotificationCenter defaultCenter] removeObserver:self
name:MPMoviePlayerPlaybackDidFinishNotification
object:moviePlayerController];

[moviePlayerController.view removeFromSuperview];
[moviePlayerController release];
}


The object we set for "object" parameter is sent along with the notification later. In this method, first we are retrieving that object with the [notification object] statement and referencing it with a new MPMoviePlayerController pointer. Next, we again send a message to the NSNotificationCenter, this time removing the observer we registered in playMovie. On nect line we cleanup our custom view controller by removing the moviePlayerController view from our display, and then we finish out by releasing the memory we originally allocated in the playMovie method.

Congratulations! We now have a working movie player in our application. My next post will be dedicated to customization of the player.

Tuesday, June 3, 2014

Apple’s WWDC 2014 Keynote: Highlights


Apple's WWDC 2014 Keynote took place today, June 2, 2014. This was a software-focused show. OS X 10.10 Yosemite and iOS 8 bring the desktop and mobile device closer together than they’ve ever been before, and a host of new developer tools should enable the creation of some powerful new apps. That includes a new programming language, Swift, which Apple hopes will replace Objective-C over time. 


Here are its the highlights :


OS X Yosemite


Apple’s new operating system will be out in its final form for free this fall. But early adopters will be able to get a look at all the new features through a public beta this summer.

NEW LOOK

The latest version of OS X includes a total visual overhaul inspired by its mobile cousin, iOS. The flat design, translucent panels, and absence of gradients and textures can be found throughout OS X 10.10, lending a much more modern look to the desktop operating system.

NOTIFICATIONS AND WIDGETS

Yosemite gives the Notification Center sidebar introduced in Mountain Lion an even more dramatic visual makeover, turning the background translucent and expanding the features to make it look and function more like it does in iOS. A "Today" view has been added to the new Notification Center, letting you see your upcoming calendar events, reminders, and the weather forecast. Finally, you can now customize the Notification Center by adding third-party widgets and apps from the Mac App Store.

A SPOTLIGHT REFRESH

Spotlight gets its first big update in years with a brand-new Alfred-esque launcher and a search field that appears in the middle of the screen. You can quickly launch apps by typing just the first few letters, browse local documents (complete with in-line preview), and search everything from Wikipedia and Apple Maps to contacts and events, all from within the new tool.

SAFARI

Apple has given its Safari web browser some radical visual and functional tweaks, first and foremost shortening the address bar at the top of the browser window and centering it. The address bar has also gotten smarter and can suggest relevant Wikipedia articles based on what you type in. Apple has given Safari a "share" button identical to that found in iOS, along with a menu that displays recent recipients. Apple is also attempting to mitigate one of its browser’s most annoying features — multiple tabs that extend beyond the browser window and out of view — by letting you scroll through them horizontally. But the most dramatic new feature is Tab View, a button that provides you a "bird’s eye" view of all the open tabs, which closely resembles the multi-tab view in mobile Safari.

MAIL GETS MARKUP

Apple promises that its problem-plagued Mail app now includes "reliable syncing." But Apple has upgraded the app with other new features as well, focusing primarily on attachments. Markup is Mail’s new built-in editor for image attachments, completely separate from Preview. It closely resembles the popular app Skitch and includes simple features such as a magnifying glass, text and shape annotations, and drag-to-resize arrows. But Markup is also smart enough to automatically transform your messy scribbles into clean, steady lines. For those emails with attachments that are so big they are rejected by a recipient’s email client, Apple has a new solution: MailDrop, a feature that lets you store attachments up to 5GB in size in iCloud and send recipients a link to download it on their own.

ICLOUD DRIVE

Apple announced iCloud Drive, a Dropbox-esque file system for storing your documents in the cloud. iCloud Drive will make everything you have stored in iCloud accessible through Finder, including your files from iOS apps. You can also add your own folders and tags to iCloud Drive, and everything syncs across your Macs — as well as on iOS and Windows.

Continuity

HANDOFF SYNCS WORK ACROSS DEVICES

Handoff is a new feature of OS X that helps you share work across devices. You can start an email on your phone and your Mac will prompt you to finish it there, for example. Or you can start a document in iWork and your iPad will suggest you continue your work there once you move away from your laptop.

AIRDROP BETWEEN IOS AND MAC

A much-requested feature from the start, you can now share files between mobile devices and Macs using AirDrop. Previously, you could only share between mobile devices or between Macs.

INSTANT HOTSPOT

You can now use your phone’s cellular connection as a Wi-Fi hotspot more easily. Yosemite will automatically find your phone and allow you to start using the connection with a couple of clicks.

SMS AND PHONE CALLS ON ALL YOUR DEVICES

Yosemite enhances iMessage to include SMS messages as well as the texts sent through Apple’s proprietary service. You can also now send and receive phone calls from your Mac.

iOS 8

INTERACTIVE NOTIFICATIONS

Taking a clear cue from Android, Apple now lets you respond directly to messages from the Notifications view and lock screen, no longer forcing you to go into the full Messages app. The useful functionality expands beyond Apple’s own apps, letting you "Like" Facebook posts or bid on eBay items directly from Notifications and the lock screen, as well. Apple lets you add third-party widgets to the Notifications Center now, too, such as sports scores or eBay auction updates, and gives you the opportunity to interact with these widgets without launching the full apps.

A STRONGER SPOTLIGHT

Spotlight’s search powers have been drastically expanded beyond the apps and contacts you already have on your iOS device. It will now show you everything from movies and songs available on iTunes (with corresponding ratings), to movie showtimes at nearby theaters, to Wikipedia articles and Maps entries.

KEYBOARDS GET POWERED UP

Apple’s new predictive keyboard provides you with smarter auto-complete suggestions, giving you a choice of several words and phrases based on the context of the text you or your contacts just wrote, as well as on your full typing history. The new feature, called QuickType, can even answer questions for you. Apple says it does this by "learning" your typing habits and does so while respecting your privacy. Finally bowing to years of requests, Apple now lets you install and use third-party keyboards by default across your iOS devices.

MESSAGES GETS AUDIO AND VIDEO CHAT

Messages is the most-used app on iOS, and it’s getting an appropriately huge update in iOS 8. The updated app allows for quick audio and video messages, self-destructing messages, and temporary location sharing, among other features. It’s also getting a much-requested feature: the ability to remove people, including yourself, from busy group-message threads.

ICLOUD DRIVE

iCloud Drive is fully integrated into iOS 8, allowing you to open documents from one app inside another compatible app. You’ll also be able to access files from your Mac that have been saved and synced through iCloud.

HEALTHKIT CENTRALIZES YOUR HEALTH INFO

iOS 8 includes HealthKit, an app for tracking personal health and fitness data. HealthKit provides an easy-to-access hub where iPhone owners can monitor important health metrics on a daily basis, and also step back to examine their fitness trends over a longer period of time. HealthKit will integrate with third-party apps and institutions including Nike and the Mayo Clinic.

FAMILY SHARING

Family Sharing is a new feature that will let up to six members of a family share iTunes purchases across devices, as long as each account is linked to the same credit card. Family Sharing also enables the sharing of calendars, reminders, photos, and Find My Friends locations across devices. And it lets parents approve or deny purchases made on their childrens' devices, making it more difficult for kids to run up large bills from in-app purchases.

A BRAND-NEW PHOTOS APP

Apple is finally trying to free your photos from their silos inside each device you own. The new Photos app in iOS 8 lets you view and edit images across your various iPhones and iPads, preserving the latest edits from one device to the other. The photos are stored in your iCloud account, and Apple gives you 5 GB free of charge to start. But beyond that, you will have to subscribe for access: 20 GB for 99 cents per month, 200 GB for $3.99 per month. Apple said it would provide up to a terabyte of storage at even higher cost. Unfortunately, the same functionality won’t make its way to the desktop until at least 2015.

SIRI IS NOW HANDS-FREE

iOS 8 also taught Siri some new tricks. Shazam integration will let Siri ID any song in earshot, and it can dim your lights or turn up your thermostat through the new smart home framework. There are backend changes too, like streaming voice recognition and improved language support, but the big news is that you’ll be able to call up the program without even touching your phone. Just say the words "Hey, Siri" and it’ll appear automatically, similar to "OK, Google" in Chrome.

For the developers

Today’s news for developers was surprisingly compelling, thanks to a brand-new programming language, a move into the smart home, and new tools for letting apps interact with one another on iOS.

SWIFT: A NEW LANGUAGE

In perhaps the biggest surprise of the day, Apple announced the creation of a new programming language: Swift. Said to be significantly faster than Objective-C, Swift represents the future of development across iOS and OS X. To enable developers to keep working on their existing apps, Swift code can live right besides C and Objective-C code in the same app.

EXTENSIONS, WIDGETS AND INTER-APP COMMUNICATION

Long requested, Apple is finally catching up to Android and Windows Phone and giving apps on your iPhone and iPad the ability to talk to one another. This is no small feat, as up until now, iOS apps have been "sandboxed," or effectively cut off from one another, which meant that moving your files and information between apps on the same device was cumbersome at best. Now with extensions, Apple will let third-party apps share the information you choose. So if you want to apply a VSCO Cam photo filter to a photo you just took, you can do it directly within the main Photos app, instead of opening VSCO Cam separately. Apple is also introducing widgets for Notification Center, letting you pin apps like eBay and Pinterest directly on the Notifications View instead of having to open those apps separately. This makes Notifications Center far more useful, providing you a lot more information that you want at a glance.

LET YOUR IPHONE CONTROL YOUR HOME

HomeKit will allow iPhones to start controlling smart devices, such as garage-door openers, lights, and security cameras. It all can be controllable through Siri: say, "Get ready for bed," and your home could automatically dim its lights and lock its doors. Apple will run a certification program for HomeKit; initial partners include August, which is known for its beautiful smart lock; Honeywell; iHome; TI; and about a dozen more.

Monday, October 21, 2013

FlipViewUtils: iOS library for customized flip animation

iOS provides a lot of in-built transition styles from one view to another view such as instant change (using addSubView), default navigation controller transition from right to left, modal view transitions from top/bottom or flip transitions. Although the one feature which I needed in one of my project was flip transition where flip should initiate from a single component of current screen which should animate/enlarge/flip and complete transition to next ViewController seamlessly.

Watch the video for the effect what I am talking about.


For the same purpose, I wrote customized code for making such a type of transition possible. Then I took out the relevant code and made this static library which gives us the option of view controller navigation using customized flip animation. This library could be just added to any project and such an animation could be achieved with as little as 2 lines of code.

You can download it from here. The usage is described in the Readme on github and it includes a demo project as well for complete understanding of how to use it.

Tuesday, June 11, 2013

Apple’s WWDC 2013 Keynote: Highlights

So there you have it, the announcement of this year’s Apple Worldwide Developers Conference (WWDC) 2013. This year, Apple gave fair warning for ticket sales and the public responded by giving giving Apple it’s fastest sold out event ever: 71 seconds. Attendees came in from 66 countries and two-thirds of them are first-time attendees.

Everyone got something from the latest WWDC keynote address. We got a new, cylinder(!) Mac Pro (tell us if you love or hate the new design), and a new OS – OS X Mavericks (they ran out of cats), with higher responsiveness and longer battery life (it’s about time); Maps gets a second chance, users get a new password-management system for iCloud, Finder gets an update and more.
If you missed it, here is a quick recap of the highlights.

1. OS X Mavericks

So because of a dwindling supply of cats, the 10th OS version was named OS X Sea Lion , OS X Mavericks, and it promises to extend battery life and provide better responsiveness, hitting a 1.4x performance improvement over Mountain Lion.

App Nap

App Nap selectively assigns power to the thing that has your immediate attention and runs on OpenGL 4 for super-responsive graphics.

Timer Coalescing

Timer Coalescing lets the CPU power up from idle mode on lower energy needs, reducing CPU memory by 72%. Even Safari has a Power Saver option to help direct power to what is in the centre of your attention.
With shared memory resource cache and power saver, Safari kills the competition, and is said to be run on only one-third of the energy of Firefox.


Apart from being able to share links more easily via Linkedin and Twitter, Safari now sports a sidebar bookmark, which actually lets you go through your Reading List as you read.

Finder Tabs

Your Finder is going the way of Tabs, like how it is with major browsers these days. Rather than have so many windows, just open up all your files into multiple tabs.
Open windows can be merged into tabs with just one clicks and files can be transferred from one folder to another just by hovering over the tabs.

Tagging

Tagging is brought to the Mac. Save a document and give it a tag and have the tags turn up automatically on the sidebar. As tagging can now be done anywhere, including on files on the iCloud, all files with the same tags can be pulled up with a single click.
Users can assign multiple tags to the same document, making all their files easy to search and retrieve.

Multiple Display

Multiple Display support allow you to work on, multiple screens, even though only one device is physically connected, even if it means you are using Apple TV as one of your screens. Full screen spaces can be pulled from one display to the next and the dock and other menus will be displayed on each connected screen as well.

Password Management With KeyChain

Apple is taking it upon themselves to better safeguard and help their users better remember their passwords, account information, Wifi-networks and even credit card numbers with iCloud KeyChain. Safari auto-suggests passwords for you, and even extends this option to your logged-in credit card information.

Respond Via Notifications

They hit the jackpot this time with responsive notifications, allowing you to reply to notifications on your Mac, as if you were on the iPhone.
Reply straight to friends who are messaging you over messaging apps, delete emails as they come in (straight on the notification), reply Facetime calls with a text message (although I’m driving now doesn’t work) among others. All notifications are logged in, and will pop up when your machine wakes from sleep.

Smarter Calendar

You can now integrate your calendar with your Facebook calendar, but more importantly, setting up an event like a simple Lunch date, prompts the calendar to suggest places for you to dine in, gives you projected weather forecasts as well as suggestions on travel time (and when you should make a move).


Sounds like Google Now to me but hey, this one lets you send your information to our iPhone when you’ve got to go, so that’s a plus.

Smoother Maps

Apart from sending calendar events and suggestions to your iPhone, you can also send directions on the Map app to the iPhone from your Mac. This will show on your lockscreen and once you are in your phone, you are taken straight to navigation.
The Map app looks smoother and 3D rendering of the Flyover data looks stunning. Just give it a spin and rotate around the Eiffel Tower to have a look.

iBooks on Your Mac

iBooks is now available on the Mac, giving users access to 1.8 million books including interactive textbooks. The table of contents can be found at the bottom of the book title, and finding a page is as easy as scrolling through the pages at bottom of the book.
You can add notes in between, highlight important text and generate study cards from those marked passages for a highly interactive learning experience.

Macbook Air Lasts ‘Full Day’

I’ll keep it brief. Enhanced battery life. 4th generation Intel core processor. Haswell ULT. 40% faster graphics, dual GPU execution units. With all this, your Air can wake up in a second, or stay on standby for 30 days.
The 11” also got an extension in battery life, staying awake now for to 9 hours. 13” goes from 7 hour battery life to 12 hours. Good news for power users on the go. 11′ starts at $999 with 128GB; 13′ starts at $1099. Both start shipping today.


Mac Pro (Became a cylinder)

When, they innovate, they innovate. The new Mac Pro now only takes up one-eighth of the original volume and packs a power in its relatively tiny frame. Two times faster than the old Mac Pro, this new addition to the family has a ‘central thermal core’ running on 12-core Intel Xeon processor, Flash storage, supports 4K displays and is available only at the end of the year.
Prices yet to be announced. And oh yeah, you can hardly recognize it too.


iOS 7

Oh yes, we got a new mobile OS version and iOS 7 promises new features (Control Center, Airdrop for iOS, smarter multitasking etc) that you shouldn’t miss and new designs as well. Siri gets a new look, we’re getting iTunes Radio, and iOS comes to life in your vehicle.
I've devoted another post to just the enhancements done to iOS 7 just so you can get to the nitty-gritty details. So don’t miss out on that.

Monday, June 10, 2013

iOS 7

Apple iOS has gone through 6 versions and now we are getting iOS 7. Announced at the WorldWide Developers Conference (WWDC) 2013, iOS 7 aimed to please with its massive redesign and fancy new features. It’s time to quench those rumors and check out what iOS 7 (beta still) has for iOS users.


While developers play with the beta version of iOS 7, which will be released for iPhone 4, iPhone 5, iPad 2nd generation and above, iPad Mini, and the 5th generation iPod touch, let’s check out what made the cut, what got updated, and the juicy details behind this latest update to the world’s most advanced mobile operating system yet.

1. UI Redesign – Flat, Simplicity

iOS has been redesigned, from the app icons and colors to typography, buttons and the general outlook — everything is simple and clean. The homescreen wallpaper uses gyroscope hardware to give the background picture a parallax effect. As you move your device, you can clearly differentiate the homescreen layer from the app icon layers, and this works throughout the system.

Translucent design on the keyboard as well as system-wide (Mail, Messages, Calendar, Game Center) are present throughout the OS; you get a view of what is happening at the back. Swipes form the left edge of the device brings you to the previous menu or back to the previous webpage. Pages for app folders have also been implemented, perfect for your ton of gaming apps.

The Notification Center now works on the lockscreen and also has a new look. You can see today’s notifications, missed notifications or all notifications through the buttons at the top. Calendar events are accessible with a single swipe all the way to the top.

2. One-Swipe Access Control Center

Access settings and options in a heart beat with Control Center. Swipe from the bottom of the screen to access settings like WiFi, Bluetooth and also change brightness and control music playback.

Control Center also allows you quick access to a few apps like the camera and calculator. It also lets you turn on the flashlight, and since Control Center works on the lockscreen, you’ll be able to turn the light on to find things in the dark without the need of finding an app.

3. Smarter Multitasking

Orientation lock and volume slider are also on the Control Center. Multitasking now lets you peek at the apps which are opened. Slide through all the app previews and double tap on a preview to launch the app.

iOS 7 recognizes your app usage patterns, and will allocate more resources for your favorite apps even with other apps open helping you to improve battery life. It’s even intelligent enough to know that you’re going to use Instagram around lunch time and will allocate resources for that behavior.

There’s also Intelligent Scheduling that works with networks where it will only push updates for an app when you have a strong network connection.

4. Safari’s New user Interface

Browsing the Web on Safari now is better with its automatic full screen mode. As you scroll down through content, the address bar that you normally see will be minimized to only show the website name. The buttons at the bottom will also be hidden until you scroll up to reveal the controls.

The address bar doubles as a search bar with new features: typing in part of a word will show you the Top Hit and also shows other Google search suggestions.

You can now open unlimited tabs on Safari. Scrolling through multiple tabs looks like you’re scrolling through a file cabinet, where you can only see the top. Just tap on the website to open it, tap and hold to rearrange the tabs or swipe it to the right to close it.

iCloud Keychain that saves password throughout all your Apple products featured on the new OS X Maverick is also integrated to Safari for iOS. Shared links by your Twitter followers are also convieniently located next to the Reader tab which syncs throughout your other devices.

5. AirDrop Sharing Between iOS Devices

AirDrop is now available for transfers between iOS devices via peer-to-peer WiFI connection. Turning on the Share Sheet on an app, you can find users who are nearby and tap items to share. A notification will appear on their device and when they open it, it will open to the relevent app and show the content that you shared.

Since it uses new hardware, AirDrop only works on the iPhone 5, 4th-gen iPad, iPad mini, 5th-gen iPod Touch.

6. Quick Camera, Geo-sorted Albums

The camera app now comes with 4 features accessible by left or right swipes: Videos, Photos, Photos in a square frame (for instagram) and Panorama pictures. New filters have also been added to the camera app on top of the basic editing features that is already available.

The Photos app also auto organizes your photos into moments based on location and date. It shows the location name and date when you first enter the Photos app. You can then pinch to zoom out and view collections where it sorts by locations only.

Zooming out again then shows you the photos taken, sorted by year. It can roughly tell you highlights of each year like you visiting another country for holiday. You can then tap, hold and swipe your finger across the small pictures for a quick view.


7. Siri & iOS In The Car

Siri is now smarter with integrated Wikipedia and Bing support built in for your search queries. There’s also Twitter where Siri can check out what your friends are saying. Other than Siri’s new look with the soundwave, it now shows results in a cleaner way.

Siri now also has a male voice, and can speak to you in French or German (more languages coming soon). Voice commands are also available for actions like "play my last voicemail", "turn on Bluetooth" or "increase brightness".


Because of these voice commands that let you change settings on the system, Siri will be integrated into 12 car manufacturers in 2014, which leads to the new feature called iOS In The Car.

With the powerful voice commands, you can easily call someone, play music, get directions with Maps or have messages read to you without you having to look at the car’s center console or iOS device.


8. iTunes Radio & More Music Control

Apple now has its own Radio app similar to services like Pandora. It’s built into the new Music app where you can see featured stations or songs that are trending on Twitter. You can create your own stations based on music genre or your favorite artist and then share it with your friends.

While music is streamed to you, you can choose to "play more songs like this" or "don’t play this song" and it’ll intelligently tweak the playlists further.


It keeps track of all the songs that you listen to on the History tab so you can opt to purchase it later. iTunes Radio is also available on your Mac, PC or Apple TV and is free with ads unless you’re a iTunes Match subscriber.

With the Music app update, you can see all your purchased music, movies and TV shows over iCloud on your device. Landscape mode also shows you all your album covers where you can just tap on a cover to start listening to it.


9. More Features

Here are a few more interesting things that you might want to know about iOS 7.

The App Store has changed where you can look for apps based on age range and view popular apps around you. Apps now also auto-update.

FaceTime will also feature audio only calls together with the ability to block numbers so they can’t reach you over the phone, FaceTime or messages.


Find My iPhone has an update with Activation Lock. Even if someone disables Find My iPhone or wipes the entire device clean, they won’t be able to use it as your iCloud user ID is required to use your device.

Notification syncing is also a new feature where notifcations that you’ve cleared will be gone throughout all your devices.

Tencent Weibo will also see more integration on iPhone.

Also, 1500 new APIs will be released to developers to integrate all the cool new features and looks of iOS 7 to their apps, so expect more features to turn up when iOS 7 comes to your iDevices this fall.