At first glance, adding in-app purchases seems like it would be a walk in the park. Apple provides plenty of documentation that should get developers up and running in no time.
So, why is adding in-app purchases such a royal pain in the arse?
Because, inevitably, something will go wrong. And when that moment arrives, you’re screwed. Apple provides a beastly amount of documentation on in-app purchases, but they don’t provide the right kind of documentation. Nowhere is there mention of the setup steps you have to take to get in-app purchases to work. Nowhere is there a checklist you can reference if your
You are left to flounder and flail like a wet noodle as you exhaustively try every possible solution on the web.
Losing days of productivity on this is ridiculous. To save you the pain and suffering I went through, this post details every step you need to take to implement in-app purchases. It’s detailed. It’s long. It’s probably overly-detailed and overly-long. But, unlike the Apple docs, it contains every single step necessary for any developer to implement in-app purchases.
Without further ado, let’s get started.
We’ll tackle the product description step first.
NOTE: You do NOT need to create an in-app test user in iTunes Connect to fetch a product description.
This is a unique App ID:
7DW89RZKLY.com.sampleapp.sampleappfree
This is not a unique App ID:
7DW89RZKLY.com.sampleapp.*
If you don’t have a unique App ID, create one as follows:
Here’s the painfully detailed step-by-step for generating and installing a new provisioning profile:
Before you can add a product in iTunes Connect, you must add the application the product is for. Don’t worry if you aren’t a 100% done with your app. You can still submit your app wtih stub data and add the real details later.
NOTE: Only the SKU and version fields are permanent and cannot be changed later.
NOTE: StoreKit does not work on the Simulator. You must test on a physical device.
NOTE: InAppPurchaseManager is a singleton class that handles every in app purchase for our app. It’s used throughout this post as an example implementation.
A couple notes about the code above:
Above, we have defined two more notifications that will be sent out with the result of the purchase transaction. For the sake of this example, we are using the
In order to test this jumble of new code, you will need to write the code that calls the
As you can see, there’s a good bit of code required to support transactions. For a full explanation of the code, see the official In App Purchase Programming Guide – http://developer.apple.com/iphone/library/documentation/NetworkingInternet/Conceptual/StoreKitGuide/AddingaStoretoYourApplication/AddingaStoretoYourApplication.html#//apple_ref/doc/uid/TP40008267-CH101-SW1.
The code above has a few parts that are specific to my implementation. Most notably, in
To create a test user, follow these steps:
So, why is adding in-app purchases such a royal pain in the arse?
Because, inevitably, something will go wrong. And when that moment arrives, you’re screwed. Apple provides a beastly amount of documentation on in-app purchases, but they don’t provide the right kind of documentation. Nowhere is there mention of the setup steps you have to take to get in-app purchases to work. Nowhere is there a checklist you can reference if your
StoreKit integration doesn’t work. Nowhere is there an NSError object that tell you exactly why your product ID is invalid.You are left to flounder and flail like a wet noodle as you exhaustively try every possible solution on the web.
Losing days of productivity on this is ridiculous. To save you the pain and suffering I went through, this post details every step you need to take to implement in-app purchases. It’s detailed. It’s long. It’s probably overly-detailed and overly-long. But, unlike the Apple docs, it contains every single step necessary for any developer to implement in-app purchases.
Without further ado, let’s get started.
Overview
Ok, folks, here’s the secret to getting in-app purchases working: break it into two distinct steps:- Create and fetch a product description
- Purchase a product
We’ll tackle the product description step first.
Create and Fetch a Product Description
Here is a (very) rough overview of each step required to create a new product and fetch its description:- Create a unique App ID
- Generate and install a new provisioning profile
- Update the bundle ID and code signing profile in Xcode
- If you haven’t already, submit your application metadata in iTunes Connect
- Add a new product for in-app purchase
- Write code for fetching the product description
- Wait a few hours
NOTE: You do NOT need to create an in-app test user in iTunes Connect to fetch a product description.
1. Create a Unique App ID
To support in-app purchases, your App ID cannot include a wildcard character (“*”). To see if your App ID contains a wildcard, log in to http://developer.apple.com/iphone, and navigate to the iPhone Developer Program Portal. Select “App IDs” from the menu on the left, and look for your App ID.This is a unique App ID:
7DW89RZKLY.com.sampleapp.sampleappfree
This is not a unique App ID:
7DW89RZKLY.com.sampleapp.*
If you don’t have a unique App ID, create one as follows:
- On the App IDs tab in the developer portal, select “New App ID”
- Fill in the following information:
- Display name: Pick a different App ID name than you were using before. You can’t edit or delete old App IDs, so just give your App ID a new name to avoid confusion.
- Prefix: Generate a new one, or choose an existing one if your app is one of a suite of apps that can share data via the Keychain Services API
- Suffix: com.companyname.appname (this is the usual format – note lack of wildcard)
- Click “Save”
- Click the “Configure” link next to your App ID
- Check box next to “Enable In App Purchase”
- Click “Done”
2. Create a New Provisioning Profile
Now that you have a new App ID, you need to generate a new provisioning profile that points to the App ID.Here’s the painfully detailed step-by-step for generating and installing a new provisioning profile:
- In the iPhone Developer Portal, select the Provisioning tab on the left
- Make sure you’re on the Development tab, and click “New Profile” in the top-right corner
- Fill in the requested information, and point to the unique App ID you just created
- If see “Pending” in the Actions column, just click the Development tab title to refresh
- Click “Download” to pull down the new profile
- Drag the profile onto the Xcode icon in the Dock to install
- Alternatively, if you want to preserve the name of the provisioning profile on disk, you can install the profile manually as follows:
- In Xcode, select Window > Organizer
- Select “Provisioning Profiles” category on the left
- Ctrl-click an existing profile > Reveal in Finder
- Drag and drop the new profile into the profile Finder window
3. Update Xcode Settings
After the profile is installed in Xcode, you need to make a couple edits to the project to use the provisioning profile:- Edit your project’s .plist file so the Bundle ID entry matches the App ID. Ignore the alphanumeric sequence at the beginning of the ID. For instance, if your App ID is “7DW89RZKLY.com.sampleapp.sampleappfree” in the Developer Portal, just enter “com.sampleapp.sampleappfree” for the Bundle ID.
- Edit your project’s target info to use the new provisioning profile:
- Select Project > Edit Active Target
- Select the “Build” tab at the top
- Select the configuration you want (usually Debug)
- Select your new provisioning profile for the row labeled Code Signing Identity
- Select your new provisioning profile for the row directly underneath the Code Signing Identity row (probably labeled Any iPhone OS Device)
4. Add your Application
If your application is already available on the App Store, you can skip this step.Before you can add a product in iTunes Connect, you must add the application the product is for. Don’t worry if you aren’t a 100% done with your app. You can still submit your app wtih stub data and add the real details later.
NOTE: Only the SKU and version fields are permanent and cannot be changed later.
- Navigate to http://developer.apple.com/iphone, and log in
- Follow the right-hand link to iTunes Connect
- NOTE: you MUST be logged in to developer.apple.com first, or bad things will happen
- On the iTunes Connect homepage, click the “Manage Your Applications” link
- In the top-right corner, click “Create New Application”
- Fill out all the requested information for your app. When asked for your application binary, check the box indicating you will upload it later.
5. Add the Product
After all that setup, we are finally ready to add the product itself to iTunes Connect.- Make sure you are logged in to http://developer.apple.com/iphone
- Navigate to the iTunes Connect homepage
- Click the “Manage Your in App Purchases” link
- Click “Create New”
- Select your application
- Fill in the production information:
- Reference Name: common name for the product. I used “Pro Upgrade”. This name is non-editable, and it will not be displayed in the App Store.
- Product ID: unique id for your app. Typically of the form com.company.appname.product, but it can be whatever you want. It does not need to have your app’s App ID as a prefix.
- Type: You have 3 choices:
- Non-consumable: only pay once (use this if you want a free-to-pro-upgrade product)
- Consumable: pay for every download
- Subscription: recurring payment
- Price Tier: price of the product. See the price matrix for the different tiers.
- Cleared for Sale: check this now. If you don’t, you will get back an invalid product ID during testing.
- Language to Add: Pick one. The following two fields will appear:
- Displayed Name: Name of your product shown to your user. I chose “Upgrade to Pro”.
- Description: What the product does. The text you enter here is sent along with the Displayed Name and Price when you fetch an
SKProductin code. - Screenshot: Your feature in action. Despite the text on the screen about the screenshot submission triggering the product review process (a very sloppy design choice, IMHO), you can safely add the screenshot now without the product being submitted for review. After saving the product, just choose the “Submit with app binary” option. This will tie the product to the app binary, so when you finally submit the 100% complete app binary, the product will be submitted as well.
- Click “Save”
6. Write Code
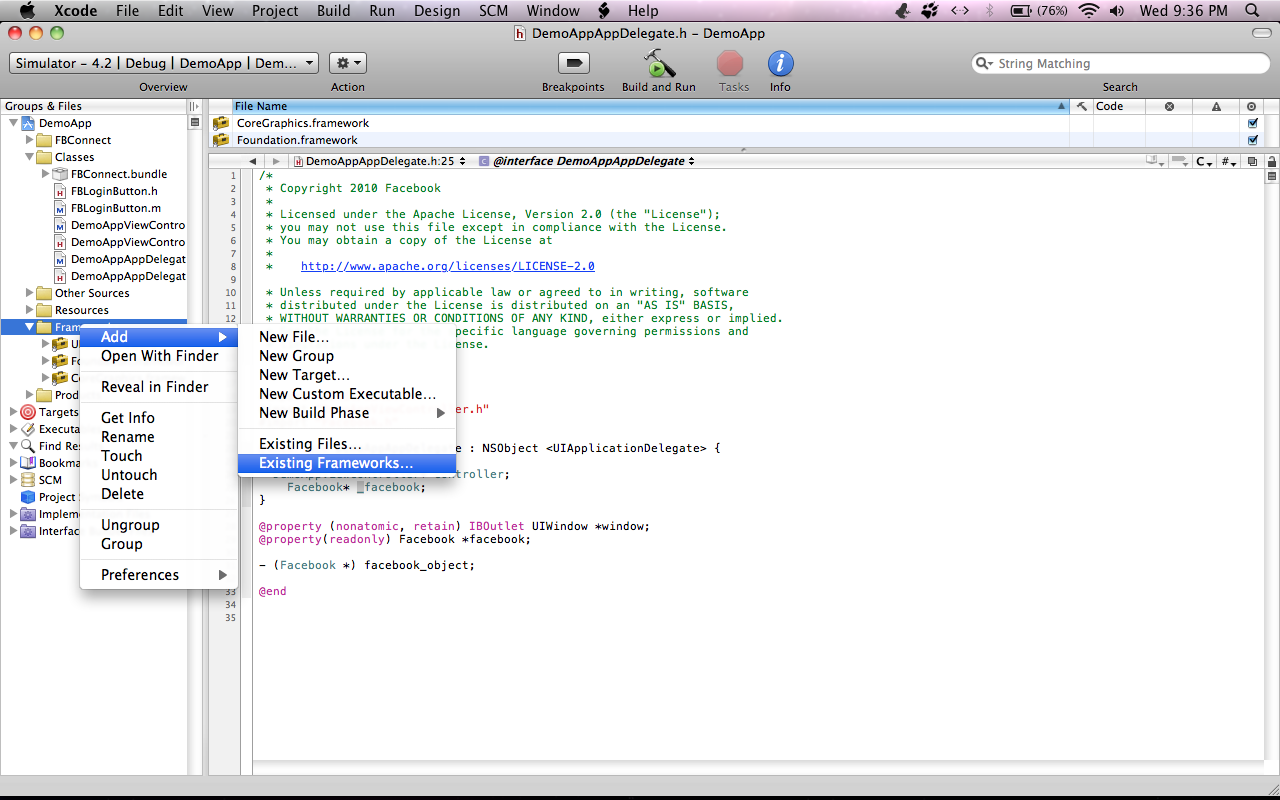
Now, we finally write the code the fetches the product information we just added in iTunes Connect. To access the product data, we need to use theStoreKit framework.NOTE: StoreKit does not work on the Simulator. You must test on a physical device.
- Add the
StoreKitframework to your project. - Add a reference to a
SKProductto your .h file:
// InAppPurchaseManager.h

#import <StoreKit/StoreKit.h>

#define kInAppPurchaseManagerProductsFetchedNotification @"kInAppPurchaseManagerProductsFetchedNotification"

@interface InAppPurchaseManager : NSObject
{
   SKProduct *proUpgradeProduct;
   SKProductsRequest *productsRequest;
}
NOTE: InAppPurchaseManager is a singleton class that handles every in app purchase for our app. It’s used throughout this post as an example implementation.
- Request the product, and implement the delegate protocol in the corresponding .m file:
// InAppPurchaseManager.m

- (void)requestProUpgradeProductData
{
   NSSet *productIdentifiers = [NSSet setWithObject:@"com.sampleapp.sampleappfree.upgradetopro" ];
   productsRequest = [[SKProductsRequest alloc] initWithProductIdentifiers:productIdentifiers];
   productsRequest.delegate = self;
   [productsRequest start];
   // we will release the request object in the delegate callback
}


#pragma mark -
#pragma mark SKProductsRequestDelegate methods

- (void)productsRequest:(SKProductsRequest *)request didReceiveResponse:(SKProductsResponse *)response
{
   NSArray *products = response.products;
   proUpgradeProduct = [products count] == 1 ? [[products firstObject] retain] : nil;
   if (proUpgradeProduct)
   {
      NSLog(@"Product title: %@" , proUpgradeProduct.localizedTitle);
      NSLog(@"Product description: %@" , proUpgradeProduct.localizedDescription);
      NSLog(@"Product price: %@" , proUpgradeProduct.price);
      NSLog(@"Product id: %@" , proUpgradeProduct.productIdentifier);
   }

   for (NSString *invalidProductId in response.invalidProductIdentifiers)
   {
      NSLog(@"Invalid product id: %@" , invalidProductId);
   }

   // finally release the reqest we alloc/init’ed in requestProUpgradeProductData
   [productsRequest release];

   [[NSNotificationCenter defaultCenter] postNotificationName:kInAppPurchaseManagerProductsFetchedNotification object:self userInfo:nil];

}
A couple notes about the code above:
- When specifying the product identifier, you must use the full product id. For instance, “com.sampleapp.sampleappfree.upgradetopro” is used above. “upgradetopro” alone will not work.
- If
response.productsis nil inproductsRequest:didReceiveResponse:and your product id shows up in theresponse.invalidProductIdentifersarray, then prepare yourself mentally for a wild goose chase. TheStoreKitAPI offers no help, no indication as to why your identifier was invalid, just that it is. Lovely, isn’t it? - The
SKProductclass conveniently offers localized versions of your app title and description, but not price. To handle this omission, here’s a category that will provide a localized price string for the product as well:
// SKProduct+LocalizedPrice.h #import <Foundation/Foundation.h>#import <StoreKit/StoreKit.h> @interface SKProduct (LocalizedPrice) @property (nonatomic, readonly) NSString *localizedPrice; @end
// SKProduct+LocalizedPrice.m

#import "SKProduct+LocalizedPrice.h"

@implementation SKProduct (LocalizedPrice)

- (NSString *)localizedPrice
{
   NSNumberFormatter *numberFormatter = [[NSNumberFormatter alloc] init];
   [numberFormatter setFormatterBehavior:NSNumberFormatterBehavior10_4];
   [numberFormatter setNumberStyle:NSNumberFormatterCurrencyStyle];
   [numberFormatter setLocale:self.priceLocale];
   NSString *formattedString = [numberFormatter stringFromNumber:self.price];
   [numberFormatter release];
   return formattedString;
}

@end
After adding all the code above, give it a shot. You should see the
product information gloriously regurgitated in your console window.
However, you are more than likely getting back an invalid product ID. This post addresses exactly how to go about debugging this problem, but the very next section may in fact hold your solution.
Then, you may just need to wait.
It takes a while for the product you added to iTunes Connect to permeate Apple’s distributed in-app sandbox environment. For me, I gave up in despair after the umpteenth time my product came back as invalid. 24 hours later, I hadn’t changed a line a code, but my IDs were coming back valid. I think it really only took a few hours for the product to propagate through Apple’s distributed network, but if you can afford to wait, you may want to give it 24 hours like I did.
All the code below is for the backend of the transaction process. It is a single class with a simple API that an outside class (like a view controller) can call to make the purchase. I recommend a similar approach if you are figuring out how best to integrate in app purchases in your app.
First, you need to conform to the
7. Wait a Few Hours
Have you followed all the steps above to the letter, and your product is still reported as invalid? Have you painstakingly double, triple, quadruple-checked to make sure you have followed every step? Have you despaired from finding frighteningly little in-app purchase information on the web?Then, you may just need to wait.
It takes a while for the product you added to iTunes Connect to permeate Apple’s distributed in-app sandbox environment. For me, I gave up in despair after the umpteenth time my product came back as invalid. 24 hours later, I hadn’t changed a line a code, but my IDs were coming back valid. I think it really only took a few hours for the product to propagate through Apple’s distributed network, but if you can afford to wait, you may want to give it 24 hours like I did.
Purchase a Product
At this point, you should be able to successfully fetch anSKProduct
description for your product. Adding support for purchasing the product
is relatively simple compared to getting the description. There are
only three steps required:- Write code for supporting transactions
- Add an in app test user in iTunes Connect
- Sign out of your iTunes Store account on your phone
- Test the purchase
1. Write Code for Supporting Transactions
First, a word of warning: you are responsible for developing the user interface for purchasing your product.StoreKit
offers absolutely zero interface elements. If you want your purchase
view to look like the App Store’s, well, you have to build it yourself.All the code below is for the backend of the transaction process. It is a single class with a simple API that an outside class (like a view controller) can call to make the purchase. I recommend a similar approach if you are figuring out how best to integrate in app purchases in your app.
First, you need to conform to the
SKPaymentTransactionObserver protocol:
// InAppPurchaseManager.h
// add a couple notifications sent out when the transaction completes

#define kInAppPurchaseManagerTransactionFailedNotification @"kInAppPurchaseManagerTransactionFailedNotification"

#define kInAppPurchaseManagerTransactionSucceededNotification @"kInAppPurchaseManagerTransactionSucceededNotification"

…

@interface InAppPurchaseManager : NSObject
{
   …
}

// public methods

- (void)loadStore;
- (BOOL)canMakePurchases;
- (void)purchaseProUpgrade;

@end
Above, we have defined two more notifications that will be sent out with the result of the purchase transaction. For the sake of this example, we are using the
InAppPurchaseManager class again, just as we did when when fetching the product description.
// InAppPurchaseManager.m

#define kInAppPurchaseProUpgradeProductId @"com.sampleapp.sampleappfree.upgradetopro"
…

#pragma -
#pragma Public methods
//
// call this method once on startup
//
- (void)loadStore
{
   // restarts any purchases if they were interrupted last time the app was open
   [[SKPaymentQueue defaultQueue] addTransactionObserver:self];
   // get the product description (defined in early sections)
   [self requestProUpgradeProductData];
}

//
// call this before making a purchase
//
- (BOOL)canMakePurchases
{
   return [SKPaymentQueue canMakePayments];
}

//
// kick off the upgrade transaction
//
- (void)purchaseProUpgrade
{
   SKPayment *payment = [SKPayment paymentWithProductIdentifier:kInAppPurchaseProUpgradeProductId];
   [[SKPaymentQueue defaultQueue] addPayment:payment];
}

#pragma -
#pragma Purchase helpers

//
// saves a record of the transaction by storing the receipt to disk
//
- (void)recordTransaction:(SKPaymentTransaction *)transaction
{
   if ([transaction.payment.productIdentifier isEqualToString:kInAppPurchaseProUpgradeProductId])
   {
      // save the transaction receipt to disk
      [[NSUserDefaults standardUserDefaults] setValue:transaction.transactionReceipt forKey:@"proUpgradeTransactionReceipt" ];
      [[NSUserDefaults standardUserDefaults] synchronize];
   }
}

//
// enable pro features
//

- (void)provideContent:(NSString *)productId
{
if ([productId isEqualToString:kInAppPurchaseProUpgradeProductId])
{
   // enable the pro features
   [[NSUserDefaults standardUserDefaults] setBool:YES forKey:@"isProUpgradePurchased" ];
   [[NSUserDefaults standardUserDefaults] synchronize];
   }
}

//
// removes the transaction from the queue and posts a notification with the transaction result
//
- (void)finishTransaction:(SKPaymentTransaction *)transaction wasSuccessful:(BOOL)wasSuccessful
{
   // remove the transaction from the payment queue.
   [[SKPaymentQueue defaultQueue] finishTransaction:transaction];
   NSDictionary *userInfo = [NSDictionary dictionaryWithObjectsAndKeys:transaction, @"transaction" , nil];
   if (wasSuccessful)
   {
      // send out a notification that we’ve finished the transaction
      [[NSNotificationCenter defaultCenter] postNotificationName:kInAppPurchaseManagerTransactionSucceededNotification object:self userInfo:userInfo];
   }
else
   {
      // send out a notification for the failed transaction
      [[NSNotificationCenter defaultCenter] postNotificationName:kInAppPurchaseManagerTransactionFailedNotification object:self userInfo:userInfo];
   }
}


//
// called when the transaction was successful
//

- (void)completeTransaction:(SKPaymentTransaction *)transaction
{
   [self recordTransaction:transaction];
   [self provideContent:transaction.payment.productIdentifier];
   [self finishTransaction:transaction wasSuccessful:YES];
}

//
// called when a transaction has been restored and and successfully completed
//
- (void)restoreTransaction:(SKPaymentTransaction *)transaction
{
   [self recordTransaction:transaction.originalTransaction];
   [self provideContent:transaction.originalTransaction.payment.productIdentifier];
   [self finishTransaction:transaction wasSuccessful:YES];
}

//
// called when a transaction has failed
//
- (void)failedTransaction:(SKPaymentTransaction *)transaction
{
   if (transaction.error.code != SKErrorPaymentCancelled)
   {
      // error!
      [self finishTransaction:transaction wasSuccessful:NO];
   }
else
   {
      // this is fine, the user just cancelled, so don’t notify
      [[SKPaymentQueue defaultQueue] finishTransaction:transaction];
   }
}

#pragma mark -
#pragma mark SKPaymentTransactionObserver methods

//
// called when the transaction status is updated
//

- (void)paymentQueue:(SKPaymentQueue *)queue updatedTransactions:(NSArray *)transactions
{
   for (SKPaymentTransaction *transaction in transactions)
   {
      switch (transaction.transactionState)
      {
         case SKPaymentTransactionStatePurchased:
            [self completeTransaction:transaction];
            break;

         case SKPaymentTransactionStateFailed:
            [self failedTransaction:transaction];
            break;

         case SKPaymentTransactionStateRestored:
            [self restoreTransaction:transaction];
            break;

         default:
            break;
      }
   }
}
In order to test this jumble of new code, you will need to write the code that calls the
loadStore, canMakePurchases, and purchaseProUpgrade methods as well.As you can see, there’s a good bit of code required to support transactions. For a full explanation of the code, see the official In App Purchase Programming Guide – http://developer.apple.com/iphone/library/documentation/NetworkingInternet/Conceptual/StoreKitGuide/AddingaStoretoYourApplication/AddingaStoretoYourApplication.html#//apple_ref/doc/uid/TP40008267-CH101-SW1.
The code above has a few parts that are specific to my implementation. Most notably, in
provideContent:, the @"isProUpgradePurchased" BOOL field of NSUserDefaults
is set to YES. All throughout the rest of the application, this BOOL is
checked to determine whether or not to enable the pro features. If you
are also implementing a free to pro upgrade product, I recommend using
the same approach.2. Add a Test User
In order to try out the mess of code you just added to your project, you will need to create a user in iTunes Connect for testing in app purchases. You can use this test account to purchase a product without being charged by Apple.To create a test user, follow these steps:
- Log in to http://developer.apple.com/iphone
- Navigate to iTunes Connect
- Select “Manage Users” on the iTunes Connect home page
- Select “In App Purchase Test User”
- Select “Add New User”
- Fill out the user information. None of the information needs to be legit. I recommend a short, fake email address and a short password since you will need to type it in your phone during testing.
- Select “Save”
3. Sign Out On Your Device
Before you can start testing in app purchases, you must sign out of the iTunes Store on your device. To sign out, follow these steps:- Open the Settings App
- Tap the “Store” row
- Tap “Sign Out”
4. Test the Purchase
Now, you are finally ready to try out an in app purchase. Testing is simple:- Run your app on your device
- Trigger the purchase
- When prompted for username and password, enter your test user details